
 It started with a drawing I made of what I wanted (promise not to laugh, I can’t draw but sometimes do when I get an idea in my head):
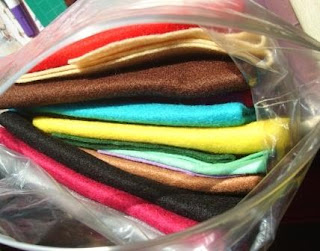
Following this I gathered different coloured felts, I used red, skin tone, brown and pink, but you can use whatever colours you have to hand:
I made a template from paper for the outline of my doll, this was done using a button for the head shape (40mm diameter) and freehand for the rest of the body. In order to make it symmetrical I drew a full head and half of the body and found the middle point in the head and folded the paper in half.
 From here I cut the template out:
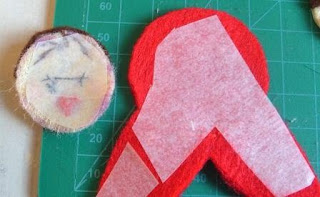
Using this template I cut out three copies of this shape from the red felt to make the back of the doll, the front of the doll and the headscarf.

For the headscarf section I folded the felt in half and cut a curve from the middle to make a symmetrical drape effect (keep the spare bit you cut off the headscarf for later).
Now for the face; I used a fabric marker to draw a circle shape straight onto the felt, again I used a button, smaller than the one previously used and cut this out:

For the hair I did the same again, cut a circle from brown felt using the same size button, and cut this circle in half:

Then as with the headscarf fold this in half and cut a curve from the middle to make a symmetrical drape effect:
 Next you need to cut the last bits of felt you will need which consist of a little flower for your doll’s dress, the tie part of her headscarf (from the scrap bit you had earlier) and some cheeks:
These were just cut freehand from the felt, they don’t have to be perfect as they are quite small.
At this stage I cut out some fabric for her dress using the template I made earlier (I sound like someone from Blue Peter now!), I used a fabric with a small pattern for the best effect. I also cut a small strip of fabric to attach the doll to the clip. I ironed this fabric into a narrow strip and stitched up one side using blanket stitch:

Now to make the face (my favourite bit):
I roughly positioned the hair to see how much space I had left to work with and drew on some eyes and a mouth using a fabric marker pen.
Using black seed beads and a beading needle I attached her eyes, after tying off at the back I went back through the felt and gave her some eyelashes using the same thread.
Changing to red embroidery silk I embroidered a mouth onto her filling it in with little stitches.
The little felt cheeks were attached with four small stitches in pink cotton.
The hair was attached with brown thread, I gave her a parting and sewed the hair as below:

After the face I attached the little felty flower to the fabric of her dress with a few little stitches and attached the headscarf tie in the same way.
Now we have all the bits we need to make our little doll.

At this stage I attached bondaweb to the back of the face and headscarf to be extra sure that they don’t come off, but this is not essential:
 Then to assemble it all:
 The face is attached to the headscarf, dress attached to the body, headscarf attached on top of the dress. The face and headscarf were then sewn to the body with little stitches.
At this stage I secured the narrow fabric strip with the clip to the front inside of the doll with lots of little stitches (in the middle). Then it was time to stitch her up. She was stitched up with a little blanket stitch around ¾ of her circumference leaving a small space for stuffing:
 Then stitch her up!
That’s it – she’s done:

I thought she looked a little lonely so...

… I made some more!
If you make any be sure to let me know.
Back Soon ♥
6 comments:
Thanks Kandi thats fab!
Poppy x
Thanks for sharing, Kandi!
Vix
xxx
Oh I wonder if I'll ever find the patience to make my Mum one!
These are really lovely...thank you for sharing. Would you mind if I make one as a gift for a friend? I'm never sure what the etiquette is, so I thought I'd just ask.Thankyou for your kind post about the parcel. I'm glad you liked it and i'm looking forward to seeing what you do with them. Lots of love, Amanda xxxx
Thanks ladies.
Amanda - Of course you can make one, they are really enjoyable to do, I am in the process of making more tonight - I am addicted and more than happy to share! x
Daisy - these would be a nice little thing for you to take with you to make up by hand, if you need any bits shout up (p.s. got your card today many thanks its very cute!)x
Kandi x
They are gorgeous! Thanks for the tutorial Kandi, Il ove Russian Dolls :)
Post a Comment