Tuesday, 31 August 2010

150 Followers Giveaway

~ ♥ GIVEAWAY NOW CLOSED ♥ ~
Well lovely ladies, here is my 150 Followers Giveaway to say a thank you for the encouragement and words of support you leave me to continue making my bits and bobs and to try new things.


I love each and every comment you leave and take heart in the fact that I have met and am in touch with likeminded people. If I could I would send you all a gift but I can't so here is a little thank you from me, as the heart says, with 'love'.


I made these from lovely Tilda fabric and they are stuffed with the softest filling and a little bit of french lavender.


I made the brooch from some vintage lace and added a recycled rose earring to make it into a brooch.


Simple Rules:


  • To enter the giveaway you don't have to follow me but I do need to be able to contact you. If you don't have a blog please leave a valid email address.

  • Just leave a comment on this post and I will add you to the list.

  • If you have your own blog and if you wish, please add me to your sidebar and link to this giveaway and I will add you again. Please let me know if you do and I will add you twice.

  • I will draw the winner in two weeks time on the 15th September.

Good Luck x


~ ♥ Back Soon ♥ ~


Monday, 30 August 2010

Happy Birthday Little One

Today is my baby boy's eleventh birthday and he looks quite happy about it:

(That is quite a severe mohawk, albeit flopped today, which will be getting chopped off before school starts!).

We celebrated with a birthday cookie:

I know he sometimes reads my blog for a giggle so I want to say;

HAPPY BIRTHDAY BABY! xxxx

In celebration of his birthday I bought myself to some flowers, here they are in my little vase which is a cheap drinking glass covered in my crochet, inspired by Amanda. It's quite sweet but you should see the ugly seam at the back, never mind I can try harder next time!

I will be back tomorrow with my giveaway.

~ ♥ Back Soon ♥ ~

Sunday, 29 August 2010

More crochet antics

You know once I get my teeth into something I always get addicted, at least for a little while until the next shiny thing comes along to catch my eye ( I have great enthusiasm but no staying power).


So I am still on with the crochet. I found this magazine recently and it came with a starter pack of 6 balls of yarn and a crochet hook so even though it was £7.99 I was quite happy to part with my cash for all the extra bits. I only started to crochet a few weeks ago and have found this magazine more use than the book I bought to teach myself. If you are new to this and want to learn you could do worse than this.


There were a few little patterns in there that caught my eye and this one I was really keen to try, look at the colours I love this:
I also really wanted to try this one too:


This is my attempt, once again, not perfect but I enjoyed making this, and once she was done, I got to make her a couple of lovely frocks, one dowdy one to match her tights and one fancy one for hitting the town:


And what girl is complete without her handbag, so I made her two one to match each frock, and a hairband in each colour too!


My son thinks she is a bit spooky, and I tend to agree but she is my baby and I love her.

My followers have crept up to 150 now (thanks so much lovely people *mmmwwwah* on the cheek for each one of you), so with that in mind I will be back with a little 150 followers giveaway really soon, promise xx

~ ♥ Back Soon ♥ ~


Thursday, 26 August 2010

iPod / Phone Pouches

Thanks for all your kind words on my last post, I'm still not right but keeping busy still.
I found a nice use for little scraps of fabric that I thought I would share with you all. The lovely and talented Amanda won a giveaway recently, which reminded me of some little phone/iPod pouches I made a little while back. I made these using the beautiful felt I won from the terribly stylish Annie the Felt Fairy :

The blue fabric in the middle is scraps from the fabric rehab stash I got recently that I used to make the hexie coaster I have shown you previously.

I made this one for my lovely bestest friend who has just announced that she is expecting a baby ~ mweeeepppp, I'm so excited and I will have to find lots of things to make for the baby.

The fabric used for the hearts and trim are made from the scraps I received from the lovely Vicki.


These were really easy to make and are all stitched by hand so can be done anywhere. The felt is cut to 5 inches x 3 inches and fits an iPod touch perfectly. The delicate embroidery thread used on the blue one has come away a bit after some use, so if you make one strengthen the top bit lots and lots where the phone goes in.

Go on make yourself one!

Don't forget the Fancy Moon 10% off offer ends at the end of August, click the link in my sidebar and enter the code kandi (case sensitive), if you had your eye on anything now is the time :)

~ ♥ Back Soon ♥ ~

Monday, 23 August 2010

My adventures in crochet

Well its been a rough couple of weeks, I have been taking medication that has left me feeling like a dizzy zombie and I have had zero energy for a couple of weeks now. As a result I have not been making anything, I have been getting home from work, cooking, and collapsing on the couch until bedtime.
One thing I have been able to do is crochet, it requires little effort on my part and my bum does not have to leave the couch, so that is what I have been pottering on with.
Remember on holiday whey I taught myself to crochet, well I wanted to do a round cushion and came up with this:


It looks all well and good until you look closer; I followed instruction on how to crochet in the round and kind of made the pattern up as I went along really as the instructions ended at the third row. I guessed at how to increase, as a result it came out wrong.

Have a look at the extra bit, I would have to fold it over to make it into a true circle and that is just no good.

Goodness only knows what I am going to do with this, perhaps a mini blanket for the cat, I'm sure she will be quite happy with the wonkyness?!?!

I have since followed instructions on how to do this properly and I have produced this:


I am much happier with this one it is actually round. I am not terribly happy with the seam that appears in there, I must be doing something wrong when I start a new row each time I will have to look into this but for now I am quite pleased with it.
Here is my dodgy seam:


I followed Lucy's pattern from Attic24 that the lovely Amanda guided me to (thanks Lucy and Amanda). I am rather pleased with my shell edging though and I found these little round duck feather cushions at Dunelm Mill last week which will be perfect for this job. So here it is all done and dusted and I plan for this to live on my bed.

Once I get my energy back and some inspiration I might start on a crochet throw for the bottom of my bed, I love them but I think it might be too big an undertaking for me, perhaps granny squares might be the way to go... watch this space.

~ ♥ Back Soon ♥ ~

Sunday, 22 August 2010

Bag Books

I love blogging and reading blogs and I get loads of lovely ideas from here but I have a love affair with books, something tangible I can touch and carry about the house and read whenever I fancy, you just cant do that with a link on the laptop!

I have been after these books for a while and found them both in my little local library recently. I swiftly borrowed them and have been pawing through them over and over.
This first one The Perfect Handmade Bag by Claire Youngs is stuffed full of lovely ideas, I had to restrict myself as to how many photos I took, I wanted to show you them all!


Owls again...

Isn't this fabric just beautiful?

I added a little piece of paper to each page that I was interested in and in the end found that I wanted them all. There is nothing for it, I will definitely be buying this one.


The next one is Sew Many Bags Sew Little Time by Sally Southern (a local girl).
Again there are lots of lovely bags in here:


This is a lovely bag and really versatile.

I really like this one I have a thing for wool and tweed fabrics, I would love to attempt this one.

I am glad I got the chance to paw through these before buying them as sometimes you can be a bit let down, but I have both of these on my wishlist now, I just hope Santa thinks I have been a good girl this year!
Oh talking of Christmas (sorry I know it's August!!) I must put my mind to some Christmas makes I am amazed at how many people are already making bits and bobs, metioning no names (*coughs* Lynda & Hazel *coughs*) and I am feeling left behind, anyone seen any good Christmas inspiration fabric makes recently?

~ ♥ Back Soon ♥ ~

Thursday, 19 August 2010

How to make you own Zip Pulls...

As promised here is a little guide as to how I make the little zip pulls on my pouches.
First up I assemble all of the bits, the beads, head pins, pliers and wire cutters.
It might look really hard and like you need loads of equipment but it's really not and you can get the pliers and cutters for about £3-5 a pair. If you fancy giving this a go you can get the bits I have used here from lots of suppliers, or maybe have a look on ebay for a starter kit with the pliers, beads and wires to get you started. I bought most of my bits from Jillybeads, Totally Beads and Rosarama Beads.
(check out my posh tupperware lid tray)
This is the best bit and the bit that takes ages, sorting out what you want to use and in what order, I usually faff with this bit for a while:

Next you grab the head pin with the round nose pliers just above the top bead and bend the wire to a 90 degree angle:
Next move the pliers up to the straight bit and grab hold again just past the bend, then using another pair of pliers wrap the wire around the pliers until it touches the starting point:

Once its at this stage this is the time to add any other embellishments and add it to the zip pull:


This is not the best picture but what happens next is that you grab the loop with one pair of pliers and with another pair you grab the end of the wire and start wrapping:


Coil the wire round and round keeping the wire taught and neat, the general rule is wrap it twice to be sure and three to be secure :)


Too many wraps will smash the delicate glass beads so just judge the space available. Once its done, snip the wire off as close to the edge as possible.


Using the crimping pliers I nip the end of the exposed wire to neaten it up and if it's still a bit raggy file it with a metal nail file.


and that's it, all done your own personal little zip pull. This method is the same for adding beads to bracelets, necklaces and earrings, once you have the basic tools you can make all kinds of stuff, and it is so addictive.

p.s. thanks to Dana for the beautiful 'made with love' tags x


~ ♥ Back Soon ♥ ~

Monday, 16 August 2010

Hexie Sewing Kit

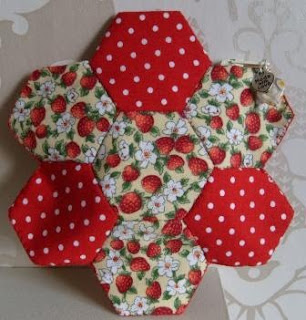
I am into my little hexies at the minute, remember the coaster I made, well I just love the look of these once they are sewn together. I made two strawberry hexie flowers and thought I could make them into a little pouch. I cut a little lining for it and grabbed a zip.


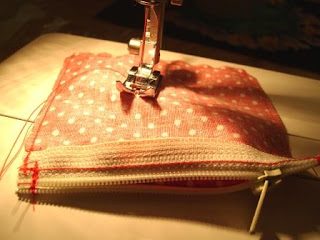
This is the little lining pouch I made (quite late at night hence the rubbish photo).

For the top two hexies on each side I had to add a hexie to the back to make the finish right,


I added the inside pouch and slip stitched it to the top, I blanket stitched all round the remaining sides and added a little zip pull ( I will show that in more detail in my next post).


I made a miniature little needle case from my little 1" hexies I added some cottons, a tape measure.


I went on to make a few more little needle cases as I thought they were quite cute!


Here is the fnished article my strawberry hexie portable sewing kit.


~ ♥ Back Soon ♥ ~