Tuesday, 18 May 2010

More Lavender Mice

Following completion of my little red spotty mouse, my lovely friend spotted him and wanted one; but in colours that would match her lounge. Hunting through my stash I found some fabrics I thought would match to I set to making a couple more mice.

These are really quick and easy to do; I followed this simple guide on the All About You site.


They were all packed up and ready to go when I realised that I had forgotten to give them whiskers, so they got a last minute overhaul.


I was quite fond of these little fellas but they have gone to a good home; I promise to visit.


E.T.A. a few of you have enquired about the packaging, this is how I usually package my stuff up. I thought I would show you how it is usually done (the one above was taken apart and got rather crumpled up!), simple greaseproof paper cut to the size required and stitched by machine or hand with a little bit of ribbon added: see below, nice and easy, perfect fit and cheap (like me :) ) x

Back Soon ♥

Monday, 17 May 2010

Cath Kidston Sew Bag ~ Amended


Remember the bag I made a couple of weeks ago from the Sew Cath Kidston Book? Well, I was really pleased with it, but I was not particularly happy with the strap.
I can’t really put my finger on why, it just kind of felt like it didn’t go somehow and I am more comfortable with handbags than shoulder bags. Each time I used it I felt a bit like a child playing dressing up and I was contemplating using it as a storage bag inside my wardrobe.

So, on Saturday morning I was thumbing thorough the latest Summer 2010 Cath Kidston Magazine and came across this picture of a bag that I loved:
… and thought that I could alter my bag to be a bit more like that one. So I got out the scissors, took the strap off, snipped the buttons off and changed it.

This is what it was after I made it originally:

And this is it with it’s new handles:


Here is me sporting it (the shape of it is a bit distorted as I had it stuffed full of heavy stuff, camera, makeup purse etc), I will actually use this much more now and I love it:

This also means that I have some spare CK fabric left over from the original strap - it is quite narrow though, I wonder what I can use it for...

Back Soon

Saturday, 15 May 2010

Swaps, and Hospitals...

Well, what an emotional weekend so far! My lovely Mum was admitted to hopsital this morning for an operation to replace her knee. I have barely slept for thinking about her and could not settle at all today until I could get to her bedside. It is such a relief that it is over but the worst is yet to come pain wise, bless her. This morning, to occupy myself I have had the sewing machine out and altered my CK bag that I made from the CK Sew Book, I will blog about that soon (photos are in camera, camera in car, car in garage - etc.).


Anyhoo, on a lighter note, I took part in Crafty Helen @ Homes Fabric swap, my first ever blog swap and it was quite exciting (well, in my little world it was). I was allocated Vanilla from Sew.Vanilla as my swap partner. Well I got in touch with her and we had a little email chat bout the kind of things we like and hate – she loves red and hates shabby chic, flowery, lacy type stuff. I am the polar opposite, I love vintage, lacy flowery stuff – my remit was anything you think your granny would love – send that!

I found it quite daunting trying to choose bits that someone I don’t know would like, but I guess that is part of the charm of a swap.

Now that she has her parcel and I have mine I can show you the picture this is what I sent:


And, this is what I received in return:


Isn’t it great! Just up my street. Many thanks Anilla x

And of course many thanks to Helen for organising this swap.

Back Soon

Friday, 14 May 2010

A Quick Recycle

I bought this lovely scarf from a charity shop a while back:
I don’t wear scarves as such but it was so pretty I just had to have it. I did try it on lots of different ways, but every way I wore it I felt like a pensioner or an air hostess!
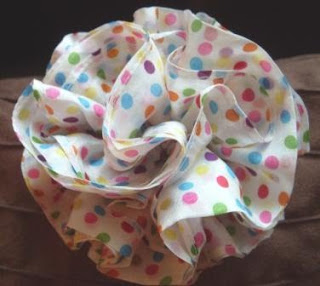
I decided that I would change it into something more wearable so I changed it into a rosette brooch.
I ironed it in half lengthwise, then folded each free edge back over and did a rosette type twist in the middle then just did a running stitch along the remainder of the scarf with strong cotton. Gathering as I went I secured it every now and then with a few stitches to the back. I finished it off with a little felt circle and a brooch back from my jewellery stash and then fluffed it up a bit.
I considered adding ribbons and lace to the back to hang from it but it was too much, due to its size I think I will leave it at this.

Voila a bright and breezy rosette to cheer up a black outfit (which is what I mainly wear, by some fluke I was in bright red that day!).


p.s. What do you think of my new header? That's my lovely Mum in a teeny weeny black polka dot mini back in 1969!

Back Soon

Thursday, 13 May 2010

♥ ~ Kandipandi 30 Followers Giveaway ~ ♥

Well lovely ladies thank you all so much for entering my giveaway, which has now closed.

This is what was up for grabs:
I created this blog as somewhere to record my little makes and to encourage me to get up and make stuff rather than sitting thinking about it ~ and so far it is working. That is mainly thanks to all of you who read my ramblings and give me support and encouragement with your kind words. That was the reason for the giveaway, a little thank you from me to you ♥
Since I created this giveaway my followers have reached over 50 now and for that thanks again, it never ceases to amaze me that people are interested in the things I make but I am glad you are!

So enough stalling, the names were all added to the family teapot, and with a little shuffle and shake the winner was selected by my beautiful assistant (my son Thomas),

and he selected:

Yeah! Congratulations Crafty Ju-Ju , I will be in touch for your details and my little present will be winging its way to you very soon, I hope you like it.

Apologies to the rest who didn’t win, (I wish I had enough to give you all one) but no doubt I will find an excuse for another giveaway soon.

Back Soon ♥

Wednesday, 12 May 2010

Russian Doll Guide

As promised here is a little guide as to how I made my little Russian keyring / bag charm, be warned it is very photo heavy, but the photos are necessary to help support my ramblings.
It started with a drawing I made of what I wanted (promise not to laugh, I can’t draw but sometimes do when I get an idea in my head):
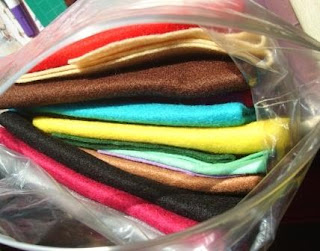
Following this I gathered different coloured felts, I used red, skin tone, brown and pink, but you can use whatever colours you have to hand:


I made a template from paper for the outline of my doll, this was done using a button for the head shape (40mm diameter) and freehand for the rest of the body. In order to make it symmetrical I drew a full head and half of the body and found the middle point in the head and folded the paper in half.

From here I cut the template out:

Using this template I cut out three copies of this shape from the red felt to make the back of the doll, the front of the doll and the headscarf.


For the headscarf section I folded the felt in half and cut a curve from the middle to make a symmetrical drape effect (keep the spare bit you cut off the headscarf for later).


Now for the face; I used a fabric marker to draw a circle shape straight onto the felt, again I used a button, smaller than the one previously used and cut this out:


For the hair I did the same again, cut a circle from brown felt using the same size button, and cut this circle in half:


Then as with the headscarf fold this in half and cut a curve from the middle to make a symmetrical drape effect:


Next you need to cut the last bits of felt you will need which consist of a little flower for your doll’s dress, the tie part of her headscarf (from the scrap bit you had earlier) and some cheeks:


These were just cut freehand from the felt, they don’t have to be perfect as they are quite small.
At this stage I cut out some fabric for her dress using the template I made earlier (I sound like someone from Blue Peter now!), I used a fabric with a small pattern for the best effect. I also cut a small strip of fabric to attach the doll to the clip. I ironed this fabric into a narrow strip and stitched up one side using blanket stitch:


Now to make the face (my favourite bit):

I roughly positioned the hair to see how much space I had left to work with and drew on some eyes and a mouth using a fabric marker pen.

Using black seed beads and a beading needle I attached her eyes, after tying off at the back I went back through the felt and gave her some eyelashes using the same thread.
Changing to red embroidery silk I embroidered a mouth onto her filling it in with little stitches.
The little felt cheeks were attached with four small stitches in pink cotton.
The hair was attached with brown thread, I gave her a parting and sewed the hair as below:


After the face I attached the little felty flower to the fabric of her dress with a few little stitches and attached the headscarf tie in the same way.
Now we have all the bits we need to make our little doll.

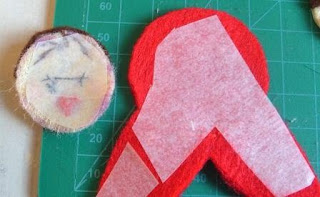
At this stage I attached bondaweb to the back of the face and headscarf to be extra sure that they don’t come off, but this is not essential:


Then to assemble it all:
The face is attached to the headscarf, dress attached to the body, headscarf attached on top of the dress. The face and headscarf were then sewn to the body with little stitches.

At this stage I secured the narrow fabric strip with the clip to the front inside of the doll with lots of little stitches (in the middle). Then it was time to stitch her up. She was stitched up with a little blanket stitch around ¾ of her circumference leaving a small space for stuffing:

Then stitch her up!
That’s it – she’s done:

I thought she looked a little lonely so...

… I made some more!

If you make any be sure to let me know.

Back Soon

Tuesday, 11 May 2010

Russian Doll ~ Matryoshkas

Following my Russian Doll find last week at the Bank Holiday car boot sale it got me thinking. Recently I have seen some lovely Russian Doll type fabric and accessories about and thought I would have a go myself.
This was the result:
I drew her shape out freehand with a fabric marker (which will disappear, so please ignore the purple pen marks), with a little help from a couple of buttons for her head and face shapes, and kind of made the rest up as I went along.
A little felt and fabric matryoshka key ring (or bag charm).

I really enjoyed making this little lady and I have already started making more of these. They are very easy to do and it is all hand sewn so (as no sewing machine is required) if you have a stinking headache (like I did at the time) this quiet sewing project is the thing to do (if anyone is interested I will do a little tutorial).
~ ♥ ~
Don’t forget it’s not too late to join my giveaway (see button at top right), the winner’s name will be plucked from the Rington’s teapot on Thursday night by my son.
Back Soon ♥