Showing posts with label hexie. Show all posts

Saturday, 25 February 2012

Monthly Make February 2012

I have been crafting a little recently but I couldn't show until now as I was making this as a gift for a friend's birthday last week.

 Handmade Hexie Knitting Bag
 This took me lots of hours but it was a labour of love as it was for my friend Lynda who I know is in need of more knitting bags (she is the knitting queen you know).  
I do love working with hexies though, it was a real pleasure.

As we are nearing the end of this month I will enter this as my February monthly make over at Annies.

I am still pottering with my crochet squares and I will start posting out once I have a few more ready.


Till next time lovely ladies ...


Sunday, 15 May 2011

1" Little Hexie Cushion Tutorial ~ Part 2 of 2


Firstly, thank you very much for all your kind comments on my post yesterday, it's clear lots of you fancy a go at this.  I would urge you to try, it's someting you can just pick up and do as and when, I think my first cushion was several months in the making!

Shirley asked yesterday about the whip stitch to connect the hexies, I thought I would show you how it's done rather than try to explain. Have a look at this YouTube Video ~ fast forward to 22 seconds.
 You simply sew through one side and straight out of the other, then bring your needle back to the start and enter the fabric next to where you started your last stitch, the cotton comes over the top each time.


As I don’t have another 144 mini hexies ready stitched I will show you the remainder of the cushion using the larger hexie front I have just completed ~ same principal.

Make the Cushion Back 

Next make a cushion back. You will need;
·        A zip ~ at least 16”long (a dress zip)
·        Two large rectangles of cotton 9" x 17”
·        Two small rectangles of cotton 3 ¼” x 2 ¾” (for ends of zip)


Start with the zip ends.  Iron a 1cm seam at each edge of the rectangle.  Fold the whole thing in half width ways and iron again.  Slip your zip end into the fold and pin in place.

 
Machine stitch this close to the edge.
Now trim the zip to the length required and add the second piece of folded fabric to the other end, pin and sew in place again.
The zip with ends attached should now be the same width as your cushion front.

Now place your zip, right side down on the long edge of your cotton (above left) and pin in place.  Machine sew the zip along one side using a zipper foot.


Now, turn your zip over and fold your fabric back, pressing it into place. 
(Trim your zip ends if they come past the end of your fabric)
  Place your second rectangle of cotton face down on your first (above right) and pin in place and machine sew as before.

Now, turn your zip over and fold your fabric back, pressing it into place.  When sewing close to the zip, as you get up to the bulky zip pull, with the needle still in the material; lift the foot and pull the zip pull past where you are sewing (above right), lower the foot and continue.


To keep the zipper neat and to stop the fabric from catching on the zip I always add a line of stitching to each edge of the zip using the zipper foot as a guide.


Now with right sides facing machine sew around each edge using a small stitch, then if you don't have an overlocker (like me) add a line of close zig zag stitches to give extra stability.  Trim your excess fabric and snip your corners to give a better finish.

Turn right side out and voila ~ you made a cushion.

You don't have to make a cushion of course, if you had the stamina you could continue on and make a fabulous quilt. 

One good idea is when you get fabric in a swap or as part of a present snip a bit off and put it in your hexie tin, when you construct your cushion you can look and see people in there through the fabrics you used.  Likewise with loved one's old clothes, snip them up and use them in your cushion.

I hope this tutorial made sense, if you have any questions or comments please get in touch.

Nb. Apologies for the dark photos in the cushion construction section, I was making this after work and I missed the light
 ♥ ~ ♥ ~ ♥ ~ ♥ ~ ♥ ~ ♥ ~ ♥ ~ ♥ ~ ♥ ~ ♥ ~ ♥ ~ ♥ ~  ♥ ~ ♥ ~ ♥ ~ ♥ ~ ♥ ~ ♥ ~ 

If you are interested in getting a little head start I have popped some starter packs in my folsky shop which come with;

♥ Full colour instructions,

♥ A little hexie needle case,

♥ 6 completed hexies to give you an idea,

♥ Approx 36 fabric squares (7cm x 7cm) enough for one quarter of your cushion,

♥ 150 little paper hexies to make your own 1" hexie cushion (no cutting required).

A good chunk of the work done for you ~ click here!

Please note there is only one of these left from the five I listed yesterday!  Thanks guys, if you need one give me a shout and I will make some more.
 
~ ♥ ~ ♥ ~ ♥ ~ ♥ ~ ♥ ~ ♥ ~ ♥ ~ ♥ ~ ♥ ~ ♥ ~ ♥ ~ ♥ ~  ♥ ~ ♥ ~ ♥ ~ ♥ ~ ♥ ~ ♥ ~


~ ♥ TTFN ♥ ~

Saturday, 14 May 2011

1" Little Hexie Cushion Tutorial ~ Part 1 of 2


I have been asked a few times to do an Idiot's guide to making and connecting the little hexies I used in my Hexie Cushion; so here it is.

Here's a good way to use up your scraps of fabric that are just not quite big enough to do anything else with.

I have a little tin that I always have close to hand and it contains lots of little hexagon shaped papers, lots of little scraps of fabric, a needle, cotton and a pair of little scissors.


Here is a link to a site that you can use to print out your hexie templates.  Remember hexagons are measured in inches by the length of one side, a one inch hexie will be just under 2" square once made.
As always there is always more than one way to skin a cat; but this is my way, this is how I do it.

~ ♥ ~ ♥ ~ ♥ ~ ♥ ~ ♥ ~ ♥ ~ ♥ ~ ♥ ~ ♥ ~ ♥ ~ ♥ ~ ♥ ~  ♥ ~ ♥ ~ ♥ ~ ♥ ~ ♥ ~ ♥ ~ 
Make The Hexies
Cut your fabric into little squares, you can cut them into hexie shapes, but I quite like the bulk of the extra fabric.  Make the squares large enough so that they cover the hexie with a little overlap, mine are around 7cm x 7cm (or 2 ¾” square).

Start folding the fabric over along one side and move on to the next edge.  This is where you start your tacking, these can be really rough stitches as they are either going to be removed or left on the reverse.  
I prefer to tack on the back only just picking up the fabric and not sewing through the paper, this way there is nothing to remove at the end and these little stitches help to keep the hexie's shape once completed.


Another method is to just sew through the lot, fabric and paper and right out the other side, I think most people do this, but it is extra work at the end and leaves little needle marks in the finished fabric.


Now comes the hard bit, make 143 more :)

Arrange The Hexies
One you have a good stash of them you can plan how you want to sew them together.  I would recommend that you make enough hexies to complete your project, rather than making the hexies and sewing as you go.  This way you will have scope to plan where you want to place them all and move them around before you finally get stuck in and sew them together.
Join The Hexies
 The most secure and easiest way to attach them together is to use a simple whip stitch.  Hold both hexies to be attached together, right sides facing, and whip stitch across the top.  Add an extra few stitches at each end to secure the joints, then just move on to the next.

For my first cushion I made hexie flowers (13) hen sewed the flowers together.  For this current one I sewed the hexies in straight lines (14) using hexie strips and then sewed the strips together.  You can pick whatever method suits you best.

My cushions are a standard 16" x 16", so I make the strips long enough to cover the 16" cushion with a little extra for the seams.  Overall looking at the hexie cushions I have made for a 16 x 16 insert, there are approx 12 hexies across and 12 hexies high, therefore 144 hexies in total (this includes the seams).

The sewing together does take a long time and your fingers will be sore!  I do mine in little chunks, they are nice to do as you can take them anywhere and you don't need any fancy equipment or a sewing machine and they quickly come together.  I would recommend using a fine needle and when stitching together use the smallest stitches you can manage (15), only picking up a few threads from each fabric side; this will ensure a neat finish on the other side.

If you have gaps at the edges of your work just cut some hexies in half to fill the gaps.  Remember that you can cut them two different ways (18), look at your gap shape first to decide which way to cut your hexie.


Finishing off the Hexies
Once you are happy with your hexie square, turn over and remove all the papers.  Just scrunch the fabric up a little to get in there and pluck them out.  The papers will get creased, but just flatten and stash them away to use again.


Now iron your work and to be sure that the hexies all stay together I like to add medium weight iron-on interfacing to the back.  It stiffens the fabric and kind of glues all the hexies together for extra stability.

~ ♥ ~ ♥ ~ ♥ ~ ♥ ~ ♥ ~ ♥ ~ ♥ ~ ♥ ~ ♥ ~ ♥ ~ ♥ ~ ♥ ~  ♥ ~ ♥ ~ ♥ ~ ♥ ~ ♥ ~ ♥ ~ 

As I don’t have another 144 mini hexies ready stitched I will show you the remainder of the cushion using the larger hexie front I have just completed ~ same principal.

I will post this tomorrow in a seperate post as poor Blogger will be groaning with all my photos today.

I hope this tutorial made sense, if you have any questions please ask.


~ ♥ ~ ♥ ~ ♥ ~ ♥ ~ ♥ ~ ♥ ~ ♥ ~ ♥ ~ ♥ ~ ♥ ~ ♥ ~ ♥ ~  ♥ ~ ♥ ~ ♥ ~ ♥ ~ ♥ ~ ♥ ~ 

If you are interested in getting a little head start I have popped some starter packs in my folsky shop which come with;


♥ Full colour instructions,

♥ A little hexie needle case,

♥ 6 completed hexies to give you an idea,

♥ Approx 36 fabric squares (7cm x 7cm) enough for one quarter of your cushion,

♥ 150 little paper hexies to make your own 1" hexie cushion (no cutting required).

A good chunk of the work done for you ~ click here!
 
~ ♥ ~ ♥ ~ ♥ ~ ♥ ~ ♥ ~ ♥ ~ ♥ ~ ♥ ~ ♥ ~ ♥ ~ ♥ ~ ♥ ~  ♥ ~ ♥ ~ ♥ ~ ♥ ~ ♥ ~ ♥ ~ 
n.b. when I started making little hexies I got a head start from the lovely Cate of 23rdSpiral (no blog) and I read Melanie's blog with great interest Texas Freckles, which is where I found the links for the hexies.  Pop over and have a look she is an amazing quilter!

p.s. thanks heavens blogger is back and working, I have really missed it ~ it's where my friends live x

~ ♥ Back Tomorrow with part 2 ♥ ~

Tuesday, 26 October 2010

Finishing Old Makes

This last week after bragging that my heavy intake of Echinacea tea is the reason why I have not had cold this year, fortune bit me on the bum and gave me this awful cold that is doing the rounds. I feel like crap and my lungs are burning from coughing. To keep me occupied I have been busy sewing, isn't sewing or any crafting great for keeping the mind busy and the problems at bay at least for a while?

Back in September I was looking for some crafty stuff that I could take on holiday without needing my sewing machine. I settled for learning to crochet and a tin of little hexies. I sat and connected them all together with tiny little stitches until my fingers actually bled. I can't work with a thimble at all and have since been advised by Jane that masking tape works a treat, and it does! So fast forward a good 6 weeks and I have actually taken the front panel and turned it into a cushion.


I attached some little hexies to the back of the cusion and made some piping for the edges, with a row of hexies, they look like pixie bunting all folded up:


Here it is a little wonky but I love it:


~ ♥ Back Soon ♥ ~

Tuesday, 10 August 2010

Hexies

I have made a start with my little hexies, I think I will attempt a hexie bag as a quilt would just be too much effort at this stage. I sat and carefully sorted the hexies into similar colours and then thought bu*%er it I will just mix it up and that way I get to see all of my lovely fabrics in one place, we have bits of Alexender Henry, Michael Miller, Cath Kidston, old bed sheet and random vintage scraps from all over the house!

I am hoping it will be ok once it's all clagged* together (is the word clagged known outside the North East?).

I have really enjoyed sewing these into little flowers by hand; it's a lovely thing to be able to do when it's not appropriate to get the machine out. As you read this if all went to plan I should be on holiday in a lovely house in the lakes with a tin of hexies in my lap!

Here you go, my pile so far:

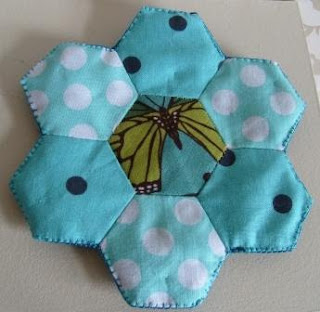
I had an idea once I saw the little flowers and set to making a padded coaster:

I cut a back for it from a vintage pillowcase.

I trimmed and ironed it to fit the shape of my flower.

I interfaced each side,


then added some fleece as padding and blanket stitched all round the edges.

And it now makes a lovely coaster for a lovely cup which is part of a gift for my best friend, who is moving jobs 40 miles away from me! I will miss you so much xoxo

~ ♥ Back Soon ♥ ~

* Clagged - meaning to stick together.

Monday, 5 July 2010

Little Hexies

I have been drooling over quilting and thought I might start small.
I have had my eye on a little bag from the Cath Kidston Sew book made up with lots of hexies.


The Hexies in this bag are quite large but I thought I would prefer to make the smaller 1” hexies as you can use smaller scraps of fabric. These are very addictive and rather calming to make and as they are very portable I can sew anywhere!

This is my little pile so far, I was asked the other day by my husband if I am in the process of making a girlie football?!? :

I carry them about in my little tin, this was full of biscuits from Past Times many moons ago!

I am quite naughty and have been eyeing up clothes in the wardrobe to cut up for hexies, I should really wait until they are ready to be re-cycled!

~ ♥ Back Soon ♥ ~

Tuesday, 22 June 2010

Sew Hip and Recycled Needle Case

I really enjoy getting the Sew Hip magazine, I love how it is great for all levels and is not crammed full of clothes only, and you get a pattern sheet for all of the makes inside. If you don't already get it, it is well worth a look it is published monthly by Kalmedia and is £3.99.

In the July magazine there was a pattern and instructions to make this little origami needle case.

I cut up the fabric I had left over from a Boden top I bought from a charity shop a while back to make these cases.

The pattern is provided for these, I traced it onto greaseproof paper so that I didn't have to spoil the pattern.


Here they are almost done.

And voila, with felt insides and a little embellishment to the front, my little origami needle cases.


They were really quick and easy to make so I make a few whilst the iron was out!

~ ♥ Back Soon ♥ ~