Tuesday, 20 April 2010

Sock Monkey Hat & Scarf Pattern

A few of you have asked for a pattern to follow to make a hat and scarf for your sock monkeys, or equivalent sized toys.
As mentioned in my previous posting I followed a pattern given to me by the lovely Claire aka 3tabbycats from the money saving expert sock monkey thread. I contacted Claire and she has kindly give me permission to post her pattern here:

The pattern was given with instructions to use 4mm needles, I only had 4 1/2 mm needles to hand so I used those.

Hat
Cast on 28 stitches ~ knit 2 ~ purl 2 until it measures about 25cm, cast off.


Fold this in half and from the wrong side stitch up each side to make a rectangular pouch.

From the wrong side again at the place that is going to be the top of the hat you can either leave this as it is and add two pom pom's ~ one to each corner (on the outside), or like I did you can gather the top of the hat by sewing a running stitch (using the same wool) along the top inside and gathering it in.

Scarf

Cast on 8 stitches ~ knit 2 ~ purl 2 until it measures about 50cm and cast off.


Pom Pom

For the pom pom the outer circle of card is cut about 2.5 cm in diameter and, for the middle circle about 1.75cm (or draw around a 5p piece) ~ remember you need two of these. Wind the wool onto the circles with a wool needle to make it easier and neater.

You can now add either tassels or pom poms to your finished creations and voila, a miniature hat and scarf!

I must admit my hat was a tad on the large side for my monkey, but this was because I used the larger needles and the pattern is intended for a ladies sock sized monkey and not a childs sock (which is what I used).


Thanks again to Claire for the instructions x


Back Soon


Kandi


x


Sunday, 18 April 2010

Saturday, Shopping and Knitting

Yesterday I finally finished knitting my little sock monkey a hat and scarf. I think they look so much better finished off with accessories. I am not a knitter it has to be said, but I followed some really simple instructions from the brilliant 3tabbycats on MoneySavingExpert, Sock Monkey Thread and came up with a little hat and scarf in no time (well, more like a couple of hours!), here he is all finished and ready for the next frost;


He was my only make this weekend so far, I have been putting off sewing until I got a rotary cutter as I have some small bits I want to cut and my eyes and scissors are just not cutting straight and I don't want to waste any more material (I lost my temper with some wonky felt on friday... I really must get a life).

Anyway shopping yesterday I found a lovely little craft shop which is close to where I live and it was a little treasure trove. In the main it has loads of stuff for cardmaking and scrapbooking, but there were sections for sewing and jewellery making along with lots of tools and bits and bobs. I was rather suprised at the prices as I thought they were very reasonable, the lady who owns it mentioned that she is a crafter and she tries to keep her prices as low as possible as she knows how expensive these hobbies can be (ain't that the truth)! This was my stash from there yesterday, including a rotary cutter;

I have left all the prices on, rotary cutter £8.45, Craft Pliers £3.95, Eyelt Plier £4.25, the cotton at the front was 30p a spool! The craft pliers are infact a crimping tool which I paid £8.95 for recently so I bought this one for my friend, at that price I couldn't not. In addition to this they run a loyalty card scheme every £10 you spend you get a stamp and fill up the card for money off.

Anyhoo, if you live in or are visiting Northumberland this little shop is Crazy Crafters, 1 Poplar Bulidings, Ashington, Northumberland (opposite Wetherspoons Pub ~ Rohan Kanhai).


Following on from my craft haul I scoured the charity shops and came away with this top for £1.50, it's not something I would wear but thought I could make it into something, it's a boden kaftan type top and it's a size 20 so plenty of material to go at.


Nb. I don't hang my tops out to dry like this it's only for the sake of the picture, my Nanna would be turning in her grave to see a top hung on the line, it was drummed into me ~ 'If you wear it on the top hang it from the bottom, if you wear it on the bottom, hang it from the top'... I really, really must get a life....

Now what to make with this material.........

Back Soon

Kandi

x


Friday, 16 April 2010

Sunny Fridays, and Monkeys...

I have had a rare day off work today, last day of the kids school holidays (hooray!).

What a beautiful day it was too, the sun was shining all day and I felt like I was wasting my day sat at the kitchen table with the sewing machine.

I started making my mam a new peg bag and I needed it finished by Sunday so I had to get stuck in. My last peg bag was quite cute but this one was much more simple (hope she likes it):


Once this was done, as the machine was out I made a little sock monkey, I did the machine sewing in double quick time and then took all my bits out into the garden to finish it off, dragging the kids out with me (kicking and screaming to be parted from their beloved computers!).


Here he is all done and dusted:


I think I had better knit him a little hat and scarf, whilst catching up with my soaps tonight!

Back Soon

Kandi x


Thursday, 15 April 2010

Craft Events in the North East of England

I found some crafty events that I was rather excited about and would love to attend.
These events are in the North East of England, so I apologise in advance to those people for whom this is too far away.

I have not attended any of these previously so I can’t vouch for them but I think I will give them a go this year and report back…

The craft Fair at Arebia was advertising for people who sell crafts to contact them so I thought this might be something I might attempt once I have enough bits to justify a stall.

Date: Saturday 29th May 2010
Times: 10am ~ 4pm
Event: Craft Fair
Where: Arebia Roman Fort, South Shields, Tyne & Wear, NE33 2BB
Link: http://www.twmuseums.org.uk/arbeia/thingstoseeanddo/event/2010/05/29/local-craft-fair/
Admission: Free


Date: Saturday 26th & Sunday 27th June 2010
Times: 10am ~ 4.30pm
Event: Farmers & Crafts Market
Where: Bede’s World, Jarrow, Tyne & Wear, NE32 3DY
Link: http://www.bedesworld.co.uk/newsevents-events.php
Admission: Free


Date: Thursday 5th August 2010
Times: 9.30am ~ 4pm
Event: Arts & Crafts Market
Where: South Shields Market Square, Tyne & Wear, NE33 1BH
Link: http://www.southtyneside.info/applications/2/whatson/event-detail.aspx?year=2010&month=04&day=08&tags=&id=1445&inst=27041
Admission: Free
Back Soon
Kandi x

Tuesday, 13 April 2010

Felty Flowers Tutorial

The lovely Louise asked me to make a little tutorial to show how I made my felt flowers. This is my first attempt at a tutorial, so please be gentle with me….

I apologise for the layout of this blog, I have had many problems getting the pictures and wording in the right places, will try harder next time.

Felty Flowers


For these flowers I have cut a strip of felt the full length of the felt square and about 3-4 cm high.


Cut the felt in a gentle curving wave to give some shape to the finished flower.
At each end cut the felt to a curved point (so you don’t have a blunt squared end petal).


Now, using a strong cotton start with a running stitch close to the bottom of the felt (about 3-5 mm).

I have used a contrasting coloured cotton for illustration purposes only, I would suggest you use a cotton to match your flower, but it should not really matter as the sewing should not be visible on the flower once it’s finished.

For the pansy type flowers:


Continue the running stitch to the end of the felt and gently gather the felt as you go, make this as loose or tight as you like, the more tight the gather, the smaller the finished flower will be.


Tie your cotton off and you should now have a curly wiggly felt spring type thing (…well, you can’t accuse me of being too technical).


Now gather the felt into a flower shape, curling it over itself (like orange peel) until you get a flower shape you are happy with. Stitch it in place with a few stitches at the back. Don’t worry of there is a little hole in the middle of your flower we can fix this next.


If you have a hole left, cut a small flower shape from your scrap felt in a contrasting colour and attach this to the middle of the flower with a couple of stitches. Hide your stitches in the middle by adding a small bead or button to the centre of your flower. If there is no hole just add a button or bead.


For the rose flowers:


Very similar to the above method except that you gather and sew as you go.


Start curling the felt round itself to make a rosebud shape, every couple of turns add a stitch to the bottom to keep it in place.


Every few turns fold the felt back on itself for about 1 to1.5 cm and stitch this in place.

Continue curling to make your rose. Tie your cotton off underneath and you are done!


Leaves


If you want to add leaves, these are really simple to make.


Cut green or brown felt into a double leaf shape, I just do this freehand and get all kinds of weird and wonderful leaf shapes.

With embroidery cotton backstitch your veins onto the leaf in a contrasting colour and tie off on the back.


You can then fold the leaves to be next to each other or have one each side of your flower.

Simply tack these onto the back of your flower and you are done!


Hope you were able to make sense of this, if not let me know and I will try to make it make sense (see what I mean).

Luv Kandi x

Monday, 12 April 2010

Felty Bits and Peg Bag

After a long day at work I have spent a while sorting out my fabric bits and bobs drawer. I have been neglecting my sewing duties and have been absorbed/obsessed with beading.
Amongst my stash I came across some felty bits I was making a couple of weeks ago and thought I could incorporate them into something I had in mind.

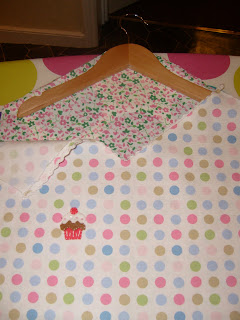
Whilst visiting my mam at the weekend I noticed her peg bag was very shabby, and it lives in the main hallway so it is always on show. I decided to make mam a new peg bag this week and thought I would add a little felty cup cake.


By the time I had sorted out my bits I don't have time to complete it tonight but made a start, got the worst bit out of the way - rikrak!! ~ I hate the stuff, but it looks so effective.


My felty flowers (will have to come up with a reason to use these soon).....


I made these little cupcakes and planned to add them to some makeup bags, but one made it's way onto mam's peg bag.


I will finish mam's peg bag tomorrow hopefully, off to watch a film and eat something for now.

Back Soon

Kandi
x

Sunday, 11 April 2010

Daring to play with wrapped loops...


Shopping for felt in Hobbycraft last week, I found a lovely green mix set of glass foil beads from Beads Unlimited (I couldn't help it, honest!). I have been trying to stop buying beads until I use up the ones I already have, which should take me a while as I have lots!!!

Generally I am attracted to anything purple and pink and always go for mixes in those colours, so I thought I would step out of my comfort zone and create something with green for a change.

Rather than the usual I have been keen to learn how to do wrapped loops, it makes such a difference to the finish and it is so much more secure than a normal loop. Getting the loops the same size is difficult and I kept wrapping the loops and forgetting that I had to add them to each other. It was so frustrating, when I finished my necklace I found that I had a small compartment on my bead tray full of wrapped loops that I had snipped off in frustration. Here is the finished item, necklace, bracelet and earrings:


I have a box of pink mix seed beads, and many of them are what I would consider girly pink and was not sure how to use them, my lovely friend (who also makes jewellery) visited us yesterday and she suggested that the bronze metal beads I recently liberated from an old necklace would work well with it, so this is what came of that collaboration:


Once I get sat down making stuff I find it difficult to stop, and ended up trawling through my beads for something else to make, and found this old necklace from New Look that I bought last year. I wore it to death until it snapped and all the spacer beads had worn away so I have made it into another necklace and stolen a couple of it's original beads to make some earrings to wear with it:


Been spending time tidying the garden up today, it's first real tidy since autumn, and whilst the sun is still out I should get out there and enjoy it.

Back soon

Luv Kandi x